 Did we miss anything on this map? Is there something we didn't discover? Let us know!
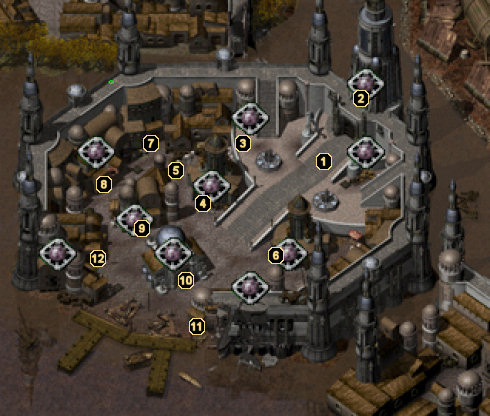
Note: The city of Saradush is a bit trickier than the locations you visited in Shadows of Amn. First, stay off of the streets. The city is under siege and just being outside is dangerous. You may want to hole up in the tavern and send someone fast and nimble out to do your errands. Second, there are Bhaalspawn everywhere. Do not assume that you are so powerful and unique anymore. Third, most of the enemies you encounter will have magical weapons (+1 and +2 regularly), often dual wield these magic weapons, and carry potions (healing is extremely common, as is invisibility). Fourth, all mages you fight will cast Time Stop. Be prepared.
1 - Arrival
After finishing your first pocket plane related quest, you have the opportunity to travel to Saradush. This is where you enter the city from your pocket plane, and of course you are instantly lulled into combat against some of Gromnir's Il Khan soldiers.
Afterwards, a helpful NPC named Melissan gives you the skinny on the city, the siege, and the numerous Bhaalspawn running around. She updates you with your first Saradush quest, which is to somehow confront Gromnir, who has barricaded himself within his stronghold while Fire Giants are besieging the city. At least being a god-child isn't boring.
As soon as you finish your conversation with Melissan, a man named Fezhak to the south will be struck by a catapult and his son will cry out for help. If you have a Cleric with the Raise Dead spell in your party, you can raise the man from the dead for an experience bonus and a point of reputation.
You will not be able to enter the stronghold until you find a way into the prison. There are a couple of different ways into the prison, but you'll need to refer to area #11 for the specifics.
There are entrances into the sewers scattered throughout the map. These aren't marked, as there are so many that it's hard to miss one. You cannot access the sewers until you retrieve the key from area #12 or go through the prison (area #11).
2 - To Castle
This entrance leads to the top level of the castle where Gromnir is, but you will not be able to go through here directly until you have entered through the prison at area #11. Standing outside protecting the city is Errard, whom you need to talk to for the quest 'Betrayal at the Gates' (see areas #3, #4, and #6).
When Kiser sends you to speak with Errard, you'll have two choices... you can either kill Errard, pleasing Kiser enough that he allows you to rescue the Countess' son (not much experience), or you can tell Errard that Kiser wants him dead and the mage will cast a Divination spell to determine the Countess' son location. He'll then send you back to Kiser's home to confront him with the truth (more experience and better solution).
3 - Mateo's Arrest
When your party enters these headquarters, you'll experience the tail end of an exchange between Captain Samand, the Countess Santele, Kiser Jhaeri, and Mateo that ultimately leads to Mateo's arrest. By questioning the Captain, and then Mateo, you can begin the quest to prove his innocence. Mateo begs you to talk to the Countess Santele (area #4), who is the witness to Mateo's wrong doings.
4 - Mirnelle Santele
If you confront Mirnelle Santele about the conversation you had with Mateo at area #3 she easily caves in and explains to you that Kiser forced her to be a witness against him. She'll tell you that Kiser has kidnapped her son and ask you to help her get him back. Once her son is returned to her, you can talk to the Countess for the quest experience and 2000 gold pieces.
5 - Elven Vagabonds
Some elves mull about this area. They're lost, homeless, and picked on. After protecting them from a barrage of soldiers, you can help them get off the streets by speaking to Sister Farielle at area #10. This will get you a rather small experience reward, but it's experience nonetheless.
6 - Kiser Jhaeri's Home
This is Kiser Jhaeri's home, the merchant involved in the 'Betrayal at the Gates' quest initiated at area #2.
7 - Street Urchins
Two street urchins are standing here behind the Tavern. The one named Squip knows some information that can help you with Lazarus' missing spellbook quest at area #8.
8 - Arcana Archives
This is the Arcana Archives, a magic shop run by Lazarus Librarus. Lazarus has a handful of nice items for sale, but he will not trade with you until you help him find his stolen spellbook.
To begin the search, talk with Hectan in the bar at area #9 and he will deny having anything to do with the theft. Afterwards, head back out to the Urchin Squip at area #7, to learn that he stole the book for Hectan. Return to the Tavern and confront Hectan with what you've learned and he will offer the spellbook if you get him a Teleportation scroll from Lazarus. Speak with Lazarus and acquire the scroll, then return to Hectan. You can either warn Hectan of the consequences, or let him use the scroll and die (which loses you a point of reputation). Now you can purchase items from Lazarus, which mainly includes some very nice high level spells.
9 - Tankard Tree
Saradush wouldn't be a town with a tavern, right? The Tankard Tree is a great place to buy/sell equipment, rest, and talk to several notable characters including Hectan the spellbook thief, Viekang the former teleporting Bhaal child, Volo the famous chronicler, Peltje the insane, and Pyrgam the proprieter. You can also defend a bar wench's honor here and fight some unruly Il Khan soldiers if you'd like, although it won't get you any sort of reward.
If you speak to Viekang, he tells you his story about how he used to teleport every time he was afraid. Melissan has taught him never to be scared, which has stripped him of this ability, and he hints to the fact that he wants the ability back. If you cast Horror on him, Viekang will become scared once more and learn to use his teleporting ability again, giving you an experience reward.
If you listen to the Peltje's mad advice, you can learn how to gain entry into the prison at area #11.
10 - Temple of Waukeen
Just outside this Temple of Waukeen, you can intervene in a fight between some humans and dwarves and earn some experience. Simply threaten to unleash the wrath of a Bhaalspawn and they will go their separate ways, after which you can head inside the temple.
Sister Farielle sells quite a few nice items and your standard healing services. She can also help house the homeless elves at area #5 and can provide you with a key to the prison at area #11. If you are of good alignment, she will provide this key willingly and warn you of the undead in the prison. If you are of evil alignment, you can still get the key if you threaten to expose a recent affair she had. If all else fails, feel free to pickpocket the key from the good Sister.
11 - Saradush Prison
There are a few ways to enter the
Saradush Prison. The easiest option is to simply get the key by either pickpocketing, threatening, or reasoning with Sister Farielle at area #10.
Another option is to fight your way through the guards at Gromnir's Barracks (area #12), raiding the chests there, and then using the acquired sewer key to gain entrance to the many different sewer grates located around Saradush. Once in the sewer, you can make your way up into the prison.
The third way and final way into the prison is to talk to Peltje in The Tankard Tree tavern at area #9, then take his advice and hire a concubine to take you into the lower levels.
12 - Gromnir's Barracks
These are the entrances to Gromnir's Barracks. Soldiers will confront you almost immediately upon entering, so be prepared for influential conversation or battle. If you choose the battle option, this is quite a fight, as the soldiers will bring in reinforcements and you'll end up fighting a swarm of enemies.
Once you've dealt with any opposition, ransack the locked chests to acquire a key to the sewers. This key will allow you to enter the sewers via any of the grates around Saradush.


