 Did we miss anything on this map? Is there something we didn't discover? Let us know!
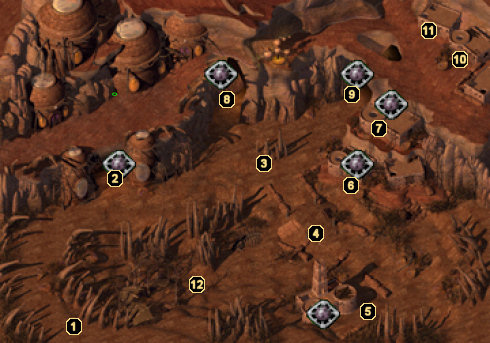
1 - Entrance
Did we miss anything on this map? Is there something we didn't discover? Let us know!
1 - Entrance
You'll come off of the open desert and enter Amkethran here.
2 - Balthazar
When you initially reach the gates to this large fortress, you will meet Balthazar, lord of Amkethran. He will tell you that you are free to do as you wish in the city, but you are not allowed to enter his stronghold. You'll also learn that Melissan has left town and Balthazar does not know of her whereabouts.
3 - Mercenaries
As you approach the center of the town, you'll hear the cries of a man named Omar Haraads. It seems mercenaries have caught his daughter Asana stealing and are going to execute her. If you intervene, you can either kill the mercenaries (not recommended) or bribe them with 5,000 gold. If you choose to kill them, you'll find that all of Amkethran's mercenaries are hostile. If you bribe them, they will let her go without a fight.
Either way, you'll gain a point of reputation and Omar will reward you with 500 gold and
Montolio's Cloak, which can be forged into a more powerful version by Cespenar the Imp if you have Montolio's Clasp.
4 - Saemon Havarian
Here you'll run into your old "friend" Saemon Havarian, the man who betrayed you back in
Brynnlaw. He is being questioned by mercenaries about some equipment he stole from them, and will tell them that *you* purchased the equipment from him. Afterwards, he will Dimension Door away and you'll be forced to fight the mercenaries.
5 - Temple of Waukeen
Just outside the Temple of Waukeen, you'll witness a Priest in a dispute with one of Balthazar's monks. After awhile, a fight will take place, and you'll be faced with two choices. Either you can allow the Priest to die, or you can intervene and attack the monk. If you attack the monk, a second monk will Dimension Door in and warn your party not to interfere. However, they'll now leave the Priest alone and as a reward, the Priest will give you the Oaken Ring (used to construct the
Heartwood Ring back in the
Abyssal Fortress).
If you donate money to the Priest to buy food and supplies, you will gain some additional experience and a point of reputation. However, if you chose not to intervene with the monk's attack on the Priest, the Priest will die and the monk will leave the area. You can then proceed to looting the Oaken Ring off of the Priest's corpse, but you'll miss out on the experience awarded from the previous method.
6 - Amkethran Inn
Inside the inn, a man named Marlowe will ask you to help him, but will claim he cannot give you the details here. He will ask that you visit his home (area #10) to learn more. Later, when you've killed both Sendai and Abazigal, you'll want to speak with the innkeeper to learn how to get inside
Balthazar's Stronghold. He will tell you to visit Faheed and Majira at area #11.
7 - Lazarus Librarus and Kerrick
When
Saradush was destroyed, Lazarus Librarus moved all of his wares to Amkethran and now makes his shop here. You'll be able to purchase all of the nifty items you could back in
Saradush. Additionally, a smithy by the name of Kerrick can be found inside. He will be too embarrassed to tell you what he can forge, but since you're reading this walkthrough, I'm just going to tell you...
Bring Kerrick the Bronze Pantalettes (from the adventurers in Abazigal's Lair), Golden Pantaloons (from the original Baldur's Gate), and Silver Pantaloons (from Shadows of Amn) and he will construct the
Big Metal Unit, a huge suit of armor that makes your character look like an Adamantite Golem. Along with the
Big Metal Unit, you'll also get the
Big Metal Rod, which can fire any of three different ammunitions he will also forge for you. What a deal!
8 - VanGoethe the Lich
This cave leads into the lair of VanGoethe the Lich, but you will not be able to enter until you've talked with Marlowe at area #10. Once you have, the guard will let you inside. VanGoethe will appear and tell you that he has taken Marlowe's daughter's soul only because Marlowe refuses to square up on a deal they made a long time ago. You can kill VanGoethe if you'd like, but a better solution is to go back and talk with Marlowe.
Marlowe will decide to face VanGoethe and hold up his end of the bargain. VanGoethe will give you Malla's Soul Stone for bringing Marlowe here and will then proceed to kill Marlowe. You can intervene and kill VanGoethe if you'd like, after which you can loot the
Ring of Anti-Venom and the Soul Stone. Additionally, once you have killed both Sendai and Abazigal, and have obtained the key from Faheed and Majira at area #11, you will be able to enter one of the small doors inside this cave in order to get into
Balthazar's Stronghold.
9 - Saemon's Smugglers
Inside this cave, you'll run into Saemon's group of smugglers. Balthazar's men will be starting trouble with them when you first enter, in which case you can intervene if you'd like. If you do, Carras will sell you his wares, which include some pretty nice magic items. Later, once you've killed Sendai and Abazigal, you can return to this cave to talk with Saemon and learn a way into
Balthazar's Stronghold.
10 - Marlowe
Marlowe, the man you speak with in the inn at area #6, makes his residence here. He will explain that a Lich named VanGoethe has stolen his daughter's soul and asks you to retrieve it for him. If you accept, Marlowe will tell you that the guard is working for him and will now let you into the cave at area #8. Go there and speak with VanGoethe to learn the full story, then return to Marlowe.
If you confront Marlowe about what VanGoethe told you, he will agree to face up to VanGoethe and follow through on his end of their deal (although you can intervene and kill VanGoethe if you don't want Marlowe to die). Once you obtain Malla's Soul Stone, you can return here to restore her to health, which will get you 10,000 experience for each party member and a point of reputation.
11 - Faheed and Majira
After you've killed Sendai and Abazigal, you can speak with the innkeeper at area #6 to learn that Faheed and Majira live here and may have a way into
Balthazar's Stronghold. Speak with them and explain that you want to see Balthazar dead just as they do, after which they will give you the key to enter the stronghold via the small door at area #8.
12 - Archery Training
During daytime hours, you'll encounter a captain training several mercenaries in archery here. If you're looking for one of the most powerful bows in the game, be sure to anger the mercenaries or simply attack them outright. Once they're all dead, search the captain for the
Darkfire Bow +4, which can be upgraded to +5 by Cespenar back in the
Abyssal Fortress. One thing worthy of note here is that the captain doesn't *always* drop the bow. According to BioWare, it is a bug in the expansion and should be addressed by
the latest patch.


