 Did we miss anything on this map? Is there something we didn't discover? Let us know!
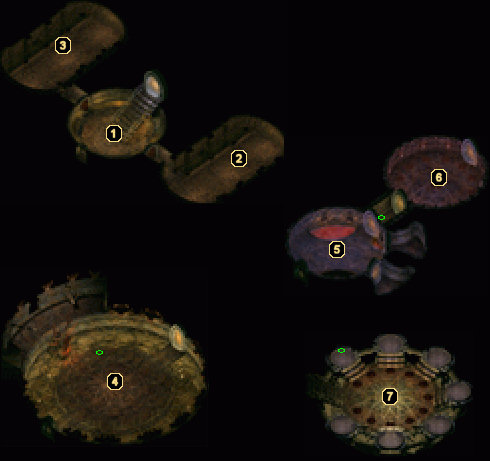
1 - Arrival
Did we miss anything on this map? Is there something we didn't discover? Let us know!
1 - Arrival
When you enter from
Sendai's Enclave 5, you will be greeted by Sendai's priestess Diaytha. She will challenge you to enter the room to your right, then teleport away. Once you've defeated both rooms, the stairs will open up to area #4.
2 - Ogremoch, Prince of Earth
Prepare yourself for a pretty serious battle before entering this room. Awaiting you is Ogremoch, Prince of Earth, along with a couple of Earth Elementals. Summon any creatures you can, then send them along with your fighters to dish as much melee damage to Ogremoch as you can. Unfortunately, there is no loot to be had for defeating him, but he is worth 56,000 experience.
3 - Diaytha Battle
You will not be able to enter this room until you've defeated Ogremoch at area #2. Once you can enter, Diaytha will be waiting for you with several Drow and a Hive Mother. Kill them, then loot Diaytha's
Darksteel Shield +4 and head up the stairs back at area #1.
4 - Captain Egeissag and his Beholder
Coming up from the stairs at area #1, you'll enter dialogue with one of Sendai's commanders, Captain Egeissag. What happens here is pretty interesting. His own Beholder will propose that you and the Captain duel one on one. To make sure there are consequences, the Beholder will cast a spell so that the allies of whoever loses will die with them.
Proceed to the duel with the captain, who shouldn't give you much trouble. If he does, have one of your characters summon some creatures
before you enter the duel. This will allow them to fight with you once you enter the arena. Once you have the Captain lying in a pool of his own blood, loot the Bowstring of Gond from his corpse (used to upgrade either
Firetooth +4 or
Taralash +4 back at your
Abyssal Fortress) and head to area #5 via the north door.
5 - Liquid Mercury
These final areas are garrisoned with Illithids and Ulitharids (even vampiric ones!). This room in particular will provide you with a few separate battles with them, but luckily you should only have to fight one at a time. After you've bested them all, search the pool to find the Liquid Mercury, which is used to upgrade
Angurvadal +4 back at your
Abyssal Fortress.
6 - Mithykyl
Sendai's Mind Flayer leader, Mithykyl, will attack you with the help of a couple of Ulitharids here. Your best bet is to send summoned creatures in first to avoid being drained of your intelligence and instantly killed. There is no loot to be had, but you're now free to confront Sendai in her lair at area #7.
7 - Sendai Battle
The end of Sendai's Enclave is at hand. Sendai will be a bit taken back that you've made it this far, but will tell you that she's prepared a surprise for you. On each of the seven platforms in the room is a statue of Sendai. One by one, they will come to life as a powerful version of Sendai (in the form of different classes - mages, thieves, and fighters) and attack you with the aid of Drow that will come in through the doorway to the southwest. Individually, the statues aren't that tough, but being attacked by the lot of them will wear your party down considerably.
After all seven statues have been defeated, you'll confront the "final" Sendai, who is much tougher than any of the statues. If you have any troubles with the statues or with the final Sendai, refer to our
Strategy Guides section to see how other people have defeated her.
Once Sendai is dead, you'll be teleported back to the
Abyssal Fortress to learn more about your heritage and to open up another of your "tests". Afterwards, when you are returned to the Enclave, loot Sendai's body for the
Studded Leather of Thorns +6 and
Wong Fei's Ioun Stone, then head through the portal to leave.


