 Did we miss anything on this map? Is there something we didn't discover? Let us know!
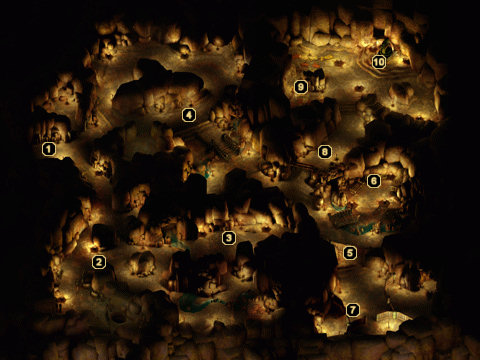
1 - Arrival
Did we miss anything on this map? Is there something we didn't discover? Let us know!
1 - Arrival
You will enter Level One here. Throughout the area you will encounter Lizard Men and Yuan-ti. Make sure that you loot all corpses and chests found. You will need to find four ropes, four Wyvern Stingers, and five Fire Agate Gems. Do not linger too long or rest often on this and the following levels or it will adversely affect an event
later.
2 - Wyverns
This area is infested with Wyverns. They are easily defeated, but can surround your party and attack weaker members if not careful. Make sure to pick up the Wyvern Stingers that they drop; you will need these later. Histachii will attack from the nearby area. They are also easily killed. Make sure to loot this area; you will find numerous helpful items. You will find the first of the ropes needed for later.
3 - Ancient Wyvern
Down this tunnel you will find an Ancient Wyvern. He is pretty easily killed. You will find a small loot stash. You will also have to come down here later on for a quest.
4 - Bridge
As you approach the bridge you will start finding Elite Lizard Man Warriors, Yuan-ti Pureblood Thieves, Yuan-ti Pureblood Warriors and Lizard Man Shaman. A short way from the bridge halt your party and send a member with good hiding or invisible and disarm trap skills to the bridge. Have them disarm the traps on the bridge. You can use the bridge as a funnel to keep the enemy out of range while taking care of the ones in front. Be aware that the Yuan-ti Pureblood Thieves can become invisible. The second rope can be found on the bridge. Use your Alt key if you cannot find it.
5 - Prison Door
You will not be able to open the Prison door, but you should hear a voice from inside informing you that the door is trapped and is opened by some mechanism. Disarm the trap on the door.
6 - Torture Chamber
The wheel to open the Prison door can be found on the torture rack to the north. As soon as you turn it you will be attacked by Lizard Men, Yuan-ti Pureblood Thieves and Yuan-ti. Be prepared for a difficult battle. More will appear after the first few are dead.
7 - Prison
Inside the prison you will find several cells. One cell holds a Wizard that will turn invisible and attack your party. In another cell you will find Nherro Fhutma. Nherro Fhutma will ask that you find his companion, Mandal; who is missing. He also asks that you find a Modified Mandrake Root that can be used to make a Sabotaged Histachii Brew.
8 - Pendulum
Use your spells and range fighters to take out the Yuan-ti Archers on the other side of the Pendulum. Be careful to not get too close or you will take damage from the Pendulum. Buff up a member with hiding skills and have them go through the Pendulum. If they have taken a lot of damage you should heal them before they travel too far.
9 - Pendulum Lever
Have the member that went through the Pendulum hide. They can sneak into the other chamber and release the lever to disarm the Pendulum. They will now be visible again and might be attacked. If they are you can run them back to the other members or run the remainder of your party forward.
10 - Grishum
Grishum will order the Yuan-ti Pureblood Warriors, Elite Lizard Men Warriors, Yuan-ti Pureblood Thieves and the Lizard Man Shaman to attack. Focus on the Lizard Man Shaman first. He will summon creatures to join the battle. After he is dead focus your attack on Grishum. With him defeated you can take out the rest of the mob. Use the Fire Agate Gems that you collected to light the braziers in the room. This will cause a doorway to open with stairs to the second level. If you did not find 5 Fire Agate Gems you can ask Nherro Fhutma for some. Proceed to Level Two.


