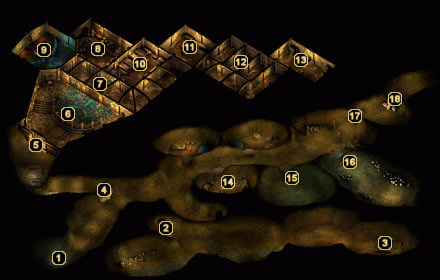
 Did we miss anything on this map? Is there something we didn't discover? Let us know!
1 - Arrival
These caves are infested with Hook Horrors. As soon as you move forward they will attack from the front and rear. Cover your weaker party members before moving forward. A Chaos spell will help during the battle.
2 - Hidden Tunnel
Here is a hidden tunnel through a small hole. Upon entering you will encounter a group of Ice Trolls. Use your previous battle experience with them to defeat. To the southwest of where they attack you is their lair. You will find some loot but, it is trapped.
3 - Duergar Corpse
As you approach this area you will be attacked by Ochre Jellies and a Shambler. The Ochre Jellies will multiply when hit. They also resist piercing damage. The Shambler resists magic and entangles. Fireballs and fire spells will work great here. Just remember to kill them as fast as possible to keep them from multiplying. The Shambler will drop Lamia's tongue. At the end of the tunnel you will find a corpse. Upon searching it you will receive a key.
4 - Boulder
Click on the boulder and it will move out of your way.
5 - Duergar Stronghold Gates
You will use the key that you received off of the Duergar corpse to open the gates.
6 - Dargab the Slavemaster
Upon entering through the gates Dargab will address you. If you express your disgust at keeping slaves the whole stronghold will attack. Tell him that you are trying to get to the Eastern Pass. He will tell you to talk with Barud Barzam. He warns to stay away from the Dungeons.
7 - Barud Barzam
Barud will tell you that you can use some mining equipment to clear boulders blocking your path through the caves. He will ask you to rid the caves of the monsters and he will reward you. Barud will watch over you while you rest and heal; which you need to do now.
8 - Storage Room
Inside this storage room you will find the mining equipment. If you try to open any of the locked crates or pickpocket anyone the whole stronghold will attack.
9 - Temple to Ladaguer
Here you will find Zama Rogadimne. You can receive healing from him.
10 - Duergar Barrack
This is the Duergar Barracks. If you try to open any locked chest they will attack.
11 - Dragu Ironbreaker
Have a character with high intelligence talk with Dragu Ironbreaker. He is having difficulty with something he is working on and you can help him finish it. He will offer you gold or a crossbow, Doom Bolter. If you help him he will now offer merchandise for sell.
12 - Dungeons
These are the Duergar Dungeons. You will see numerous people wandering around. None of them will give any useful information.
13 - Torture Chamber
Inside this room is a spirit that believes you are his friends that abandoned him. You can try to talk him out of attacking you, if not, he will start a fight. He isn't difficult to kill.
14 - Cave Rooms
Inside each of the cave rooms are more Hook Horrors. You will be attacked by the ones inside and more that spawn outside of the room. You do not have to open any of these doors to proceed with this area.
15 - Fire Beetles
This room is infested with Fire Beetles. They are not difficult.
16 - Egg Room
As you enter this room it will appear empty. Upon approaching the corpse you will soon find out it isn't. A Hook Horror Matriarch, Hook Horror Guardians and Hook Horrors will appear and attack. They will also be joined by Hook Horrors from outside. This is a very difficult battle. You will need to make sure your weaker party members are covered or they will soon die. As you enter you can trap the door with Cloudkill or Skull Trap. Using Confusion or Chaos spells will also help.
17 - Doorway
This doorway will be guarded by Hook Horrors and Hook Horror Guardians. Again more Hook Horrors will appear behind you. Use the same strategy as before.
You should now return to Barud and receive your experience for clearing the caves. He will also give you a Shield of Fortitude, Duergar-Forged Axe and other items. He will also ask you to kill the monks at the monastery. If you have evil characters you can accept this quest, if not decline. If you do accept this quest and do not have evil characters it will not hamper your future game play. Rest and heal your party before proceeding.
18 - Boulder Cave-in
Use the mining equipment to clear the boulder cave-in. You will exit here.