 Did we miss anything on this map? Is there something we didn't discover? Let us know!
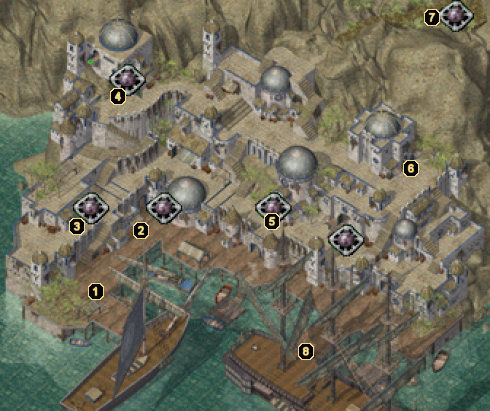
1 - Ambush
Did we miss anything on this map? Is there something we didn't discover? Let us know!
1 - Ambush
Once you arrive at the dock in Brynnlaw, Saemon will reveal his treachery. He has organized an ambush by three Vampires here at area #1. The fight isn't too rough, but Saemon will escape before you're able to give him a little payback.
Also, after you've saved Claire from Lady Galvena's Festhall at area #2, you'll meet up with a man named Golin here. He will explain what you must do in order to get inside the Asylum. You have two choices - convince the Pirate Lord Desharik that you are crazy and need to be admitted or visit the cowled wizard at area #6, kill him, and take his wardstone.
2 - Lady Galvena's Festhall
Here you'll find Lady Galvena's Festhall, which is basically just your average brothel. After witnessing Sanik's murder and talking to the bartender at the Vulgar Monkey (area #5), you'll be lead here to find Claire. You have a few choices here. You can enter the Festhall and kill everyone, offer to pay for some good wholesome fun, or just convince the courtesan outside to sneak you into her room. With either of the first two choices, once inside, you'll end up having to fight the guards when you try snooping around. This isn't a bad option, though, since you'll earn some combat experience and be able to loot a
Halberd +2 off one of the guard's corpses. If you take the third route, you can do some pretty sneaky stuff.
Once she sneaks you into her room, she talks about the guards outside the room and how you will have to fight them unless... Here she gives you a vial of sleeping potion and tells you to take it to Ellie the cook. Go into the kitchen, where the guards will challenge you. Tell them to back off as Lady Galvena doesn't tell them everything and they don't know what they are talking about. They will back off. Go into the kitchen and give the potion to the cook. She will put it into some beer after a bit of reassuring talk. The helper will deliver the beer to the two guards in the hallway and the one inside of Lady Galvena's rooms. The guards will be knocked out and you won't have to worry about them anymore.
Anyway, no matter which route you take, within one of the rooms, you'll find Lady Galvena herself and a mage by the name of Vadek holding Claire hostage. Kill them, grab their loot (which includes a
Flail +2, some
Leather Armor +3, a
Quarter Staff +2, and a
Dart +1, and then escort Claire out. She will bring you to a man named Golin near area #1 who will explain how you can get admitted to the Asylum (see area #1 for your choices). After talking to Golin on the docks (if you chose to take the sleeping potion route), go back and talk to the cook in order to receive a total of 12,000 experience points.
3 - Cayia
You'll find Cayia, Desharik's main squeeze, having her way with another man in this home. If you have returned from the Asylum and have decided to sail back with Saemon, you will need to grab the Pirate Horn from one of the tables inside here. If you're caught, Cayia will summon some guards, but nothing you can't handle. Grab the horn and head to area #8 to sail away.
4 - Desharik
Desharik, the Pirate Lord, makes his residence here. After speaking with Golin at area #1, this will be one of your choices to be admitted to the Asylum. Simply convince Desharik that you are insane and he will send you to the Asylum. Additionally, once you have finished with the Asylum, if you decide to sail with Saemon, you will have to go toe-to-toe with Desharik at area #8.
5 - The Vulgar Monkey
The Vulgar Monkey is Brynnlaw's local tavern. On your first time entering this place, you'll witness a man named Sanik get assassinated. Dispatch of his assassin and then talk with the bartender. He will tell you of Sanik's romance with Claire, one of the women working for Lady Galvena at area #2. You'll want to rescue her in order to find a way to enter the Asylum.
Additionally, once you've completed the Asylum, assuming you've chosen to sail with Saemon off the island, this is where you'll meet him. He will explain that his boat has been stolen and that the only way off the island is to steal Desharik's boat (the Pirate Lord). Before doing so, however, he will ask that you visit Cayia's home at area #3 and steal the Pirate Horn that can be used to open the gates to the sea beyond Brynnlaw.
Another small quest worth mentioning has to do with a man named Chremy, who is standing near the entrance. First of all, you'll need to talk to a beggar-lady tucked in the eastern portion of the map, and if you're nice she'll tell you about Chremy and how he is forcing her and her brother to beg for coins and give them to the pirates. You can arrange for their escape by killing Chremy and talking to a smuggler at the docks (he'll charge 200 gold to stow them away).
6 - Perth, Ginia, and a Hidden Treasure
This is the home of Perth, a cowled wizard and owner of a wardstone that will allow entrance to the Asylum. If you've spoken with Golin at area #1, he will tell you of the wardstone and you can proceed to swipe it from Perth's hands. He's not too difficult, but he has some high level mage spells that can be a bit tricky. Once you drop him, grab his wardstone and the
Book of Many Spells, then head to the Asylum.
Near the entrance to Perth's home, you'll also find a girl named Ginia who tells you how her parents died when the pirates took over the town and how the pirates now oblige her and her brother, Ason (who can be found on the west side of the map besides the pirate lord's house), to do prostitution and pickpocketing. If you offer to help her and her brother, she will tell you of their master, Chremy, who must be killed in order for them to be delivered.
Chremy can be found beside the Vulgar Monkey Tavern at area #5. After you have killed him, you can also pick up his medallion which allows you to enter the basement of Lady Galvena's Festhall (this is unrelated to Ginia's quest however - see area #2 for more). Once you've killed Chremy, you also need to go to the docks, not far from Lady Galvena's Festhall, and find a smuggler named Calahan. He will charge you a total of 200 gold to bring Ason and Ginia to Ulgoth's Beard. After you've paid him, you'll earn 2000 experience points and can go and tell Ginia the good news. Finishing the quest will earn you another 9000 experience points.
Before leaving this area, search for a small niche just up the stairs from Ginia. Inside you'll find a
Wand of Paralyzation.
7 - Exit
The pathway here leads up to the Asylum.
8 - Pirate Ship
This ship belongs to Desharik, the Pirate Lord. Once you've completed the Asylum, assuming you've chosen to ride back with Saemon, you will head to the Vulgar Monkey to meet up with him. He'll explain that his boat has been stolen and that he intends on stealing this one. Get the Pirate Horn from area #3, then meet Saemon here.
Desharik and some of his fellow pirates will show up and you'll be forced to slay them, but Saemon will reward you with half of the
Silver Sword for doing so (the blade). You'll realize just how much of a snake he is, however, when you set sail and are attacked by a ship full of Githyanki (who are looking for the very Silver Sword piece that Saemon just gave you). During battle with the Githyanki, the ship will submerge into the depths and you'll awaken in the
Sahuagin City.


