 Did we miss anything on this map? Is there something we didn't discover? Let us know!
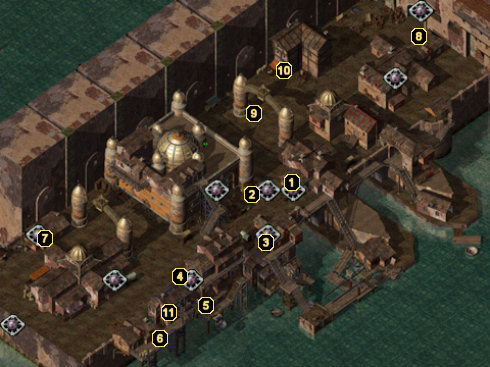
1 - Five Flagons Inn
Did we miss anything on this map? Is there something we didn't discover? Let us know!
1 - Five Flagons Inn
The Five Flagons Inn resides here, which is the source for the Haer'Dalis quests. If you proceed to the basement, you'll see some actors put on a play that is ridiculed by the crowd. If you talk to the actors after the show, they will explain that one of their fellow actors has been kidnapped by a wizard named Mekrath. After scouring the
Athkatla Sewers to find Haer'Dalis, you'll eventually end up in
Mekrath's Lair, which is where you'll ultimately find the missing bard.
Once you've freed him, return here with the gem from Mekrath's altar and the bards will open up an Astral portal with it. Haer'Dalis is once again captured (along with his fellow actors) and brought to the
Astral Prison. If you go in after them, there are some nice items to be found, along with some good experience to be gained. The choice is yours.
If you have Mazzy in your party (having rescued her from the Temple Ruins), Samuel Thunderburp will thank you profusely for saving her and award you with some
Boots of Stealth.
2 - Marketplace
Here is a little marketplace where you'll first start investigating the
Bridge District murders, which you first learned about from Aegisfield the town guard at area #8. If you talked with Rampuh at area #9, you will have the Exotic Hide, which you'll need here.
To start off, talk with Rose. She'll tell you about a certain scent she smelled at one of the murder scenes. She'll ask you to get some Oak Bark, Solik Berries, and some Gulil Berries and bring them back to her. The merchant to the west of her, Bel Dalemark, will sell you exactly what you need. Bring these back to her to learn that there was a smell of leather in the air during one of the murders.
Next, show the Exotic Hide to Bel to learn that it's actually elephant leather. The two previous clues give you a prime suspect: the town tanner. Return to Aegisfield to present both pieces of evidence and he will pay a visit to the tanner himself. At this point, you have done everything needed to pay a visit to the tanner yourself.
3 - Tanner's Shop
This is the town tanner's shop, the prime suspect of the murders after you've discovered all the evidence and information you can at area #2. If you've found enough evidence to convinc Aegisfield to pay a personal visit to the tanner, you'll be able to get a confession out of Rejiek (earning you 23,250 experience points). The tanner won't stay and fight, though, and will instead run down to the lowest level of his shop.
When you reach the lower basement, you'll be confronted by a mage named Vellin Dahn, two Rune Assassins, and two Ghasts. Vellin insists that Rejiek's work must go on and attacks you party to buy time for the tanner's escape. Kill all the resistance, then search the nearby crate to find the Gesen Bow Shaft (needed to forge the
Short Bow of Gesen). You'll also notice that a ship recently departed from this lower level, meaning the tanner is probably long gone by now. If you chose this route, Aegisfield is no longer alive to report your success. However, this triggers a whole new quest when you next arrive in
Trademeet.
If you originally did not have enough evidence to persuade a confession out of the tanner, you can still force him into battle. This will net you some Human Flesh and a letter. Using the letter, you can visit
Umar Hills and talk with a man there in order to have the Human Flesh forged into the most powerful leather armor in the game - the
Human Flesh +5. Evil, I know, but it's great armor. At this point, you can return to Aegisfield the town guard and get your reward for solving the murders.
4 - Delosar's Inn & Limited Wish Quest
Delosar's Inn is not the most active place, but it is an important area to visit for the quest obtained from a Limited Wish spell. To obtain the quest, cast Limited Wish to summon a Djinni. Ask the Djinni for a one-time wish, then select the quest option. The Djinni will grant your wish for a quest and give you a scroll, after which he'll disappear.
The scroll contains information about a bill regarding a Captain Dennis and his band of mercenaries. When you visit Desolar's Inn after receiving this quest, you'll be approached outside by a beggar named Vittorio. The beggar will ask you to help him collect money from Captain Dennis and his men. Agree to help him, then head inside.
Once inside, you'll learn that Vittorio stole a gong from Dennis and sold it to buy some ale. Vittorio will ask you to reobtain the gong, explaining that he sold it to Roger the Fence, a shady merchant within the sewers below the
Temple District.
When you reach Roger the Fence, he'll tell you that he no longer has the gong. Before he'll tell you what he did with it, he'll request that you dispatch of a Sea Troll here in the sewers for him. Once the troll is dead, Roger will explain that he sold the gong to a Troll Shaman in the Troll Mound near
Trademeet. Make your way to the
Druid Grove, then head left to reach the Troll Mound.
The Troll Shaman will not reveal the location of the gong and will instead insist on a fight. Once the shaman nears death, it will ask you to spare its life in exchange for information about the gong's whereabouts. If you accept, the shaman will tell you that the gong was sold to an Ogre Mage within a tower to the northeast. Now that you have the information, feel free to finish the Troll off.
When you finally reach the Ogre Mage, you can simply trade a
Wand of Frost for the gong.
5 - The Twisted Rune
Ahhh, the Twisted Rune. It's a sneaky little place nestled back here in an unmarked area of the Bridge District. If you have a
Rogue Stone, you can open the door on the side of this building and be transported to an entirely different dimension (be wary however, as there is a Disintegration trap tagged to the door).
Once you arrive at the new dimension, prepare your party before moving into the next room, where you will have to fight a completely insane battle involving high level wizards, Vampires, and a Beholder. It's ugly, but the spoils are worth it. After you've won the battle, grab the
Staff of the Magi off of the female wizard Layette and use the Beholder's eye to go back to Faer�n.
6 - Tirdir's Attackers
If you've been to the
Graveyard District and found the man named Tirdir buried alive, you will run into the men responsible here. You can confront them using the piece of red cloth that Tirdir gave you. Of course, you'll have to fight them... they never come quietly. Wipe them out and grab the
Boots of Avoidance off the man named Reti.
7 - Nasty Neb
After getting the sculpture quest from any of the temples in the
Temple District, you'll eventually be lead to this house. You'll find Neb here, an absolutely worthless man of many crimes. Kill him and then grab
Neb's Nasty Cutter (his dagger), the 200 pounds of Illithium you need, and his head. You can bring his head to the Council of Six in the
Government District for a reward.
8 - Aegisfield
Aegisfield, the town guard is standing post here. He'll tell you about some recent gruesome murders in the area and of course you'll end up volunteering to help. You can start the investigation at area #9.
9 - Rampuh the Beggar
You'll talk with a beggar here by the name of Rampuh. You can gather some good information about the murders from him, although he will want 100 gold pieces to reveal what he knows. Once paid, he'll give you a piece of Exotic Hide (a piece of leather) that was left at the scene of one of the murders. You can bring this back to the marketplace at area #2 for further investigation.
10 - Silver Horn of Valhalla
You can grab yourself the
Silver Horn of Valhalla searching through this house. Bring the horn to
Waukeen's Promenade to have it upgraded.
11 - Golden Torso
Within this locked door you will find one of the tombs required for the Kangaxx the Lich quest. Once you dispatch the lich, you'll have to grab the Golden Torso to bring to the
Docks District.
12 - Ankheg Shell & Spellcasters
This row of buildings holds a couple of notable findings. Searching the middle building will earn you an ankheg shell, which is nice to have early on in the game. If you have 5,000 gold pieces to go along with it, you bring it to Cromwell in the
Docks District to forge the
Ankheg Plate Mail.
The far right building contains a good battle with four spellcasters. You'll immediately be attacked by them, so be prepared before you enter the building. The one named Falytiar is worth 12,000 experience, Pitre is worth 6,000 experience, Dracondras is worth 8,000 experience, and Valeria is worth 12,000 experience, so you don't want to miss out on this building once you're able to defeat them. Afterwards, there are some trapped chests in the room that can be looted for
Bracers of Defense AC 7, some scrolls, and some jewelry.


