 Did we miss anything on this map? Is there something we didn't discover? Let us know!
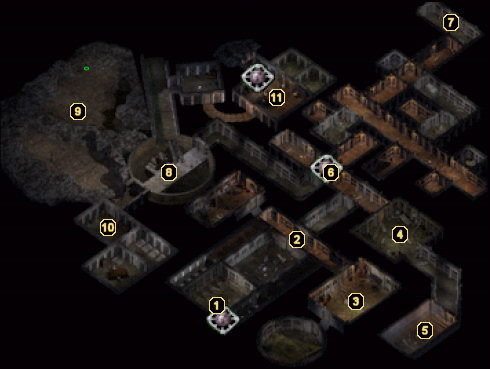
1 - Arrival
Did we miss anything on this map? Is there something we didn't discover? Let us know!
1 - Arrival
When you arrive on the second level of the Windspear Hills dungeon, your party will immediately be under attack by Orc Archers that line the walls around the two entrance rooms. Move quickly through the first two locked doors or you'll find yourself filled with arrows quickly.
2 - Hallway Battle
When you enter this hallway, you'll be faced with a difficult battle against a random creature type. If you're fairly high level, you may end up fighting an Adamantite Golem and two Stone Golems. If this is the case, you'll want to make sure you've equipped magical weapons on as many character as possible so that you're capable of inflicting damage... and inflicting it quickly.
3 - Troll Cook
Here you'll do battle with the Troll cook and some of his Hobgoblin friends. After the battle is over, search the room to nab some
Arrows +2 and
Bolts +2.
4 - Vampire Ambush
A handful of Vampires await you in this room, so you'll probably want to prepare your party beforehand. Once all of the creatures have been destroyed, search the area to find some
Darts of Wounding.
5 - Chapel Key
Another group of undead inhabit this room, but which type depends on your party's level. We've seen the room contain a group of Shadows and a Shadow Fiend and we've also seen it contain a Greater Wraith. Either way, send the abominations back to the netherworld, then scour the area to earn some
Darts of Stunning,
Bullets +2, and the Chapel Key.
6 - Samia
Here you'll meet a woman named Samia. She'll ask you to retrieve some papers from King Strohm III's tomb, which is located up at area #5. You'll need the Mask of King Strohm III to enter the tomb, which is broken into various pieces. To construct it, kill each of the guardians in the maze of tunnels and take their respective piece. When finished, the mask will automatically appear in your inventory.
If you're feeling really daring and are looking for a challenge, you can also head north into the long tan corridor just above to do battle with a Beholder called the "Director". He's worth 10,000 experience points, but drops no treasure.
7 - King Strohm III Tomb
This is the tomb of King Strohm III. You'll need the mask to continue (refer to #6), but once inside you can loot the tomb for a
Dragonslayer sword and a
Dragon Scale Shield +2.
At this point, Samia will show up and explain that she only used you to get into the tomb and attack you with the help of some goons. Kill her for her treachery, then loot the bodies for a
Battle Axe +2, a
Large Shield +2, a
Wand of Fear, a
Medium Shield +1, and a suit of
Plate Mail +1.
8 - Dragon Helm
Crank the bucket up to the top of this well to earn yourself the
Dragon Helm. Keep in mind, however, that you will have to fight an Air Elemental that comes up with it.
9 - Golem Treasure
A Greater Werewolf will confront you when you enter this area, so you'll want to be prepared. Once you detect the secret door on the eastern cave wall and head inside, you'll find yourself in an even tougher fight, though.
Upon entering the hidden cavern, an Adamantite Golem and a couple of Stone Golems will charge your party. If you have any difficulty with them, I'd suggest reading through the many strategies for defeating golems in our
Strategy Guides section. After all of the Golems are destroyed, search the niche at the end of the cave to find
Heartseeker +3 and a Beljuril gem.
10 - Grancor the Wolfwere
A couple of soldiers try to lead your party into an ambush here, but don't let them fool you. Confront them and expose them as the Wolfweres that they are! Once the soldiers change into their bestial form, kill the Greater Wolfwere and the three regular Wolfweres, then search the two nearby rooms to find 40
Bolts +2, 20
Bolts of Biting, 20
Darts of Stunning, 40
Arrows of Ice, the
Horn of Blasting, and scrolls of Hold Undead, Hold Monster, and Chaos.
11 - Tazok
Here you'll face Tazok, one of Sarevok's goons in the original Baldur's Gate. He is now loyal to Lord Jierdan Firkraag and will put up a pretty good fight. Fighting alongside him is Chief Digdag, who packs a decent punch as well.
Once you've bested them both, loot their corpses for a
Two Handed Sword +2,
Full Plate Mail +1, and
Delver's Plate +2. You'll find that Garren's daughter/son is locked up in a cell here, but you'll need to descend to
Windspear Dungeon 3 in order to obtain the key (via the stairs to the north). Before doing so, though, scour the room to find yourself two
Rogue Stones.
After you have secured the key from below, return to the cell of Garren's son/daughter and unlock it to earn 23,750 experience points.


