 Did we miss anything on this map? Is there something we didn't discover? Let us know!
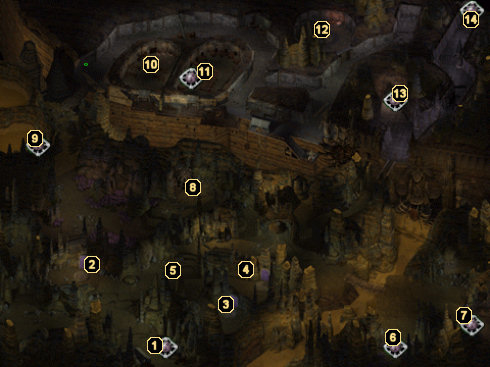
1 - Duergar
Did we miss anything on this map? Is there something we didn't discover? Let us know!
1 - Duergar
A few Duergar dwarves are camped here. Get whatever information you can out of them, then inquire about buying items. Make sure you buy at least one Freedom scroll, as you'll need it for area #5.
2 - Air Gate
A gate to the Elemental Plane of Air. Elementals will spawn from this portal for a period of time, so it's a great place to earn some experience if your party is capable of defeating several of the creatures in a row.
3 - Earth Gate
A gate to the Elemental Plane of Earth. Elementals will spawn from this portal for a period of time, so it's a great place to earn some experience if your party is capable of defeating several of the creatures in a row.
4 - Fire Gate
A gate to the Elemental Plane of Fire. Elementals will spawn from this portal for a period of time, so it's a great place to earn some experience if your party is capable of defeating several of the creatures in a row.
5 - Vithal
If you use one of the Freedom scrolls that you bought from the Duergar dwarves at area #1 (you listened to me and bought one, didn't you?), a mage by the name of Vithal will be released from Imprisonment and appear here. He will ask for your assistance in traversing the three Elemental gates, but first he needs the Book of Rituals. You can get this book from the Svirfneblin innkeeper at area #10.
Once you return the book to Vithal, he'll bring you around to each Elemental gate. You'll have to kill a Greater Elemental at each one, with the element depending on which gate you're at. Once all of the Greater Elemental guardians are destroyed, Vithal will reward you with the
Rod of Absorption. If you demand more of a reward, you'll end up having to do battle with him. However, this does end up getting you a better reward, as you can loot the
Skull of Death and some nice ninth level scrolls from his body.
6 - Exit
This exit leads to the
Beholder Dungeon.
7 - Exit
This exit leads to the
Mind Flayer Dungeon.
8 - Prison Globe
Here you'll find a large iron globe with little "windows" all around it. Clicking on each window will reveal that the globe is actually some sort of prison cell and will release a prisoner each time you click on it. There are six prisoners total, and these are the ones that appeared for me:
- Alchra Diagott: You'll have a fight on your hands here. This Lich attacks right away and has some nasty spells at his disposal. He will drop some high level scrolls, although I'm not sure if they are random or static. After my battle, I was able to grab scrolls of Summon Nishruu, Delayed Blast Fireball, and Spell Turning.
- Riti: Once again, a battle is inevitable. After combat concludes, search Riti's body for a
Spear +3: Backbiter.
- Madman Aganalo: This guy isn't happy to see you either and another fight ensues. When the lunatic is dead, loot his body for
Jhor the Bleeder +2.
- Raevilin Strathi: After you've convinced Raevilin that he shouldn't have attacked you, you can loot a couple of decent scrolls from his corpse.
- Bedlen: Luckily, you won't have to fight this guy. He instead thanks you for releasing him and tells you that his father will reward you at the Svirfneblin camp at area #10.
- Gont: You'll get to talk to this guy for awhile. If you irritate him via dialogue, you can find yourself in yet another battle. There are no items to be had, but you'll earn yourself 7000 experience points and a handful of gold when h's dead.
9 - Exit
This exit leads to the
Kuo-Toa Dungeon.
10 - Svirfneblin Innkeeper
The innkeeper has Vithal's Book of Rituals for area #5 and is also the father of Bedlen, one of the prisoners you can free at area #8. If you've already freed Bedlen, the innkeeper will give you some
Bracers of Defense AC 4.
11 - Goldander Blackenrock
You'll meet Goldander Blackenrock here, a Svirfneblin who tells you about a creature that they discovered while digging at area #12. He asks that you kill the creature and then seal the hole with a Stoneshape Scroll that he gives you. If you do so, you'll earn an additional 25,000 experience points and he'll hand over the light gem to enter Adalon's lair at #13 and the
Skullcrusher +3.
12 - Balor
A gaping hole can be found here, which just so happens to be lair to a creature that the Svirfneblin encountered while digging. If you've spoken with Goldander at area #11 and received the Stoneshape Scroll, you can climb into the hole and fight the demon Balor. After he's dead, use the scroll to seal the hole to earn 26,000 experience points and then head back to area #11.
13 - Exit
These stairs lead down to the lair of Adalon, the Silver Dragon. You'll need Goldander's light gem from area #11 in order to go into the lair.
14 - Exit
This exit leads to the Drow city of
Ust'Natha. You can't enter the city until you've met with Adalon at area #13 and she's cast a Drow illusion on your party.


