 Did we miss anything on this map? Is there something we didn't discover? Let us know!
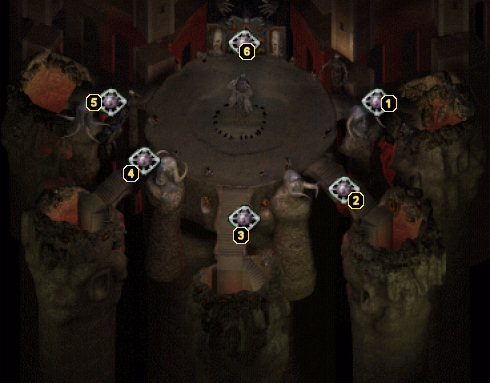
Note: The first five locations each offer a test you must pass to gain a Tear of Bhaal and open the door out of hell. The trials can be completed in any order.
1 - Pride Test
Here a demon will talk you up and flatter you with words of how great a warrior you are. It's all a ruse to try and get you to attack a green dragon that lies behind him. If you do not fall for the flattery, the dragon will hand over a Tear of Bhaal willingly.
2 - Panic Test
This time, a demon will talk to you about overcoming your fear, after which it will offer a cloak of Nymph skins that protects against panic. If you refuse the cloak, you will face one of two rooms. On one side is a room full of Beholders and Gauths. The other is just a room filled with scary sounds that cause your characters to panic. It is probably possible to enter this room and pick the chest open (filled with some potions that you will need later), then get to the back of the room and get the tear. However, both rooms are connected at the back, and if a character panics, they'll open themselves up for some serious pain from the Beholders. Therefore, you may want to just charge the room right away so you can dispatch the creatures before subjecting yourself to any panic issues.
3 - Selfish Test
This demon kidnaps one of your party members, then forces you to choose one of two paths. If you choose the first side, the protagonist will lose points from his or her statistics (health, attributes, etc.). If you choose the other side, the demon kills whichever character he has kidnapped. This turns out to be the better route, as you can simply resurrect this character and be on your way. However, if you are a Paladin or a Ranger, you will become
Fallen if you choose this route, so we highly recommend losing a few points from your statistics instead.
4 - Greed Test
For this test, a demon hands you
Blackrazor, which is by far one of the best weapons in the game. However, you are then faced with a difficult choice. You can either give the sword to the enslaved Genie and receive the Tear of Bhaal without consequence or you can do battle with the Genie and keep both the sword and tear for yourself. If none of your characters really need
Blackrazor, you may want to consider handing it over to avoid combat and keep your characters at full strength for the other upcoming challenges.
5 - Wraith Sarevok
Instead of a demon greeting you at the fifth trial, you are instead confronted by Wraith Sarevok. He will taunt you and do everything he can to anger you, in an attempt to get you to change into the Slayer. If you're able to resist, you still have to kill him for the Tear of Bhaal that he holds.
6 - Final Irenicus Battle
You'll need to place the Tears of Bhaal that you recover into the sockets of this door. Each time you place one, your main character will gain permanent stats. Therefore, you may want to consider putting the Tears here as you recover each one in order to make yourself stronger the other trials still left.
After you have placed all of the Tears, the door will open and put you face to face with Irenicus again. This time, he too has the power to change into the Slayer, and he uses it. He also summons a large contingent of demons and Pit Fiends to help him. If you have any troubles beating him, refer to our
Strategy Guides section.
Once you've defeated him, you'll get to watch a very interesting cinematic of Irenicus awakening in his own personal hell, as well as a group of Bhaal priests discussing the protagonist's future. Congratulations on winning one of the best CRPGs ever created!


