 Did we miss anything on this map? Is there something we didn't discover? Let us know!
Note: To reach Trademeet, you must first speak to Flydian in the
City Gates district and agree to help the town out of its... difficulties.
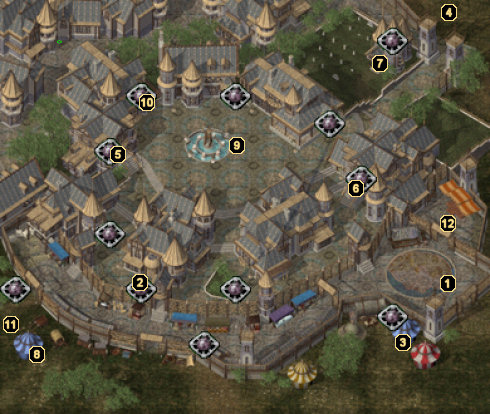
1 - Arrival
Trademeet has been completely overrun by bears, spiders, wolves, and other types of animals, so you've agreed to come here and investigate. Hack your way through the first few animals, then speak to the Militia Captain and explain that you've come here to help. The captain will direct you to the High Merchant, Lord Logan Coprith, whom you'll find at area #2.
2 - Mayor's Home
Head inside the mayor's house and speak to High Merchant Logan Coprith. He will tell you that the local Druids are to blame for the revolt in nature and explains that the town has even captured one of them. However, Logan is convinced that this captured Druid has nothing to do with the trouble and is instead investigating the Druids responsible. Logan will ask you to head into the small prison in the basement of his home and speak to the captured Druid.
When you reach the lower level, make your way into the second cell to speak with Cernd, the captured Druid. Cernd will explain that he was investigating an order of Druids that apparently have broken away from the traditional hierarchy. If you choose to help him investigate the problem, Cernd will offer to join your party. If you decline, he will still mark the location of the
Druid Grove on your map and head there alone to meet you.
When you return from the grove victorious (having removed Faldorn from power), the High Merchant thanks you and your party is awarded 18,000 experience points and 2000 gold pieces. He will then mention another trouble the town is having, this time with some Dao genies. Apparently the Dao genies helped the town by selling goods, but now they refuse to sell anything more until a Raksasha named Ihtafeer is hunted down and beheaded. If you agree to help with the problem, Logan directs you over to Guildmistress Busya for more information.
Walk out in the hall and speak to the Guildmistress. She'll tell you that the genies have an economic stranglehold on the town and that you should head to their tents at area #3 and try to find a solution. In return, she offers you a gold reward, as well as "an item of some power" that the guild has in its stores. For more information about the quest (and what happens afterwards), see area #3.
3 - Dao Djinni
Speak with the Dao Djinn Khan Zahraa inside the blue tent to learn that they are hunting a Raksasha criminal named Ihtafeer and won't allow any goods to be sold in Trademeet leave until someone kills her and returns her head to them. You have the option of trying to remove the Djinn by force, but we recommend helping the Djinn find the Raksasha instead, as it is a bit more lucrative. If you do choose the forceful way, though, you can loot the
Scimitar +2, Rashad's Talon from Khan's corpse once he falls.
If you decide to track down Ihtafeer for the genies, you can begin your search near Trademeet's eastern exit (area #4). Here you can speak with a Shadow Thief informant named Itona to learn that the Raksasha you are looking for can be found at the
Druid Grove. Apparently the Raksasha has shapeshifted into an old potion-seller named Adratha and is accompanied by two other Raksashas, so expect a fairly difficult battle. When you arrive at the grove, you'll find the Raksashas at area #6.
When you return to Trademeet after defeating the Raksashas, the Djinn will reward you with the
Scimitar +2, Rashad's Talon and you'll be awarded 10,000 experience points. Then, when you speak with the Guildmistress again, she will hand over 7500 gold pieces, lots of gems (including a
Rogue Stone) and the
Shield of Harmony +2. Finally, when you speak to Logan again, he will declare your party as the Heroes of Trademeet, which will earn you a point of reputation, 10,750 gold pieces, and 25,250 experience points for every party member.
As the celebration concludes, you will be approached by the Lady Lilith Lurraxol and asked to meet her at her mansion to discuss a potential job. Before you can say anything, she will leave and Lord Skarmaen Alibakkar will approach to proclaim that the Lady is a liar and that you should instead work for him. Whom you choose to work for really doesn't matter, as a final decision must be made regardless of who you're dealing with. See areas #5 and #6 for more information.
4 - Itona
If you have accepted the Dao Djinn's quest at area #3, you'll run into a Shadow Thief informant named Itona right here on the eastern outskirts of Trademeet. She is aware of your commitment to kill the Raksasha and offers to tell you exactly where Ihtafeer can be located if you promise to slay the beast. Agree to her terms to learn that the Raksasha can be located at area #6 in the
Druid Grove. If you decide to betray Itona and kill her, though, you can find yourself a pair of
Gloves of Missile Snaring.
5 - Alibakkar Estate
After you've been declared heroes for purging the Druid Grove of its evil, you'll find Lord Skarmaen Alibakkar in his estate here. He'll ask you to acquire the Mantle of Waukeen from the tomb at area #7 in order to prove that his ancestor founded Trademeet. If you accept, he'll hand over the Trademeet Tomb Key to start your search.
6 - Lurraxol Estate
After you've been declared heroes for purging the Druid Grove of its evil, you'll find Lady Lilith Lurraxol in her estate here. She'll ask you to acquire the Mantle of Waukeen from the tomb at area #7 in order to prove that her ancestor founded Trademeet. If you accept, she'll hand over the Trademeet Tomb Key to start your search.
7 - The Trademeet Crypt
Once you've obtained the Trademeet Tomb Key from either Lord Skarmaen (area #5) or Lady Lilith (area #6), you can enter this crypt. When you unlock its doors for the first time, however, you will be confronted by High Merchant Logan Coprith. Logan will tell you that obtaining the mantle for either family will only result in bloodshed and instead asks you to bring the mantle to him in order to avoid such a conflict. He leaves the decision up to you, though, and then takes his leave.
The crypt is guarded by two Skeleton Warriors and two regular Skeletons, so you shouldn't have much trouble acquiring the mantle. Once all four undead have been taken out, search the remains to find two
Two-Handed Swords +1 and the Mantle of Waukeen. With the circlet acquired, make your way to the Mayor's House (if you prefer the non-violent approach) or to the estate that contracted you.
If you choose to hand the mantle over to the Mayor, you'll gain a point of reputation, 8000 experience points, and 250 gold pieces. However, if you instead give the mantle to one of the nobles, the other one will show up and the situation will quickly degenerate. The Lord and Lady are both mages and they will attack you along with all of the guards that are around the house. After dispatching them, the Mayor will once again shows up to scols you for contributing to the ruckus. The only real advantage to this route is that you can loot a set of
Elven Chain Mail from Lord Skarmaen's corpse.
8 - Wilfred the Red
This tent is actually the town brothel, but it isn't really operating due to the recent problems with the Dao Djinn. However, you can still head inside and speak to the man named Wilfred the Red to hear his tale of defeating a huge Red Dragon and looting its treasure. After he's done speaking, tell him that you think he's a liar and he'll confess that he actually stumbled into a sleeping dragon's lair and stole some of its gold. Out of embarassment, he will hand over 1000 gold pieces and take off out of the tent. This will also get you 1000 experience points.
9 - Neeber
If you have purged the Druid Grove of its evil and have already participated in the town celebration, then you may want to stop by the town fountain to see the statues that have been erected in your honor. Be wary, however, as the dreaded Neeber is also visiting the fountain! Neeber was the annoying man from the original Baldur's Gate and now he's back again with a whole lot more dialogue to throw at your party.
After enduring about twenty annoying comments from Neeber, he finally gives up and your party is awarded 1000 experience points. Before leaving, Neeber gives you a handful of "rocks" that other people have thrown at him. As it turns out, the "rocks" are actually five
Bullets +2.
10 - Tiris' Home
After you have solved the skinner/murderer quest in the
Bridge District (and Rejiek has escaped), you will be approached by a woman named Jenia when you next arrive in Trademeet. Jenia will ask you to speak with her boy, Tiris, whom you'll find in the house at this location.
Tiris will tell you that he and his girlfriend Raissa were attacked on their way home a couple of days previous. When he awoke, his girlfriend was tied to a chair and he was forced to run for his life from a skinless man. He also recalls that the skinless man referred to an accomplice as "Rejiek", so you'll know that the tanner from Athkatla is involved. Tell Tiris that you'll help him and he will refer you to the southwest gate of Trademeet, where the creature was last seen. Head to area #11 to speak with Darsidian Moor, who will shed more light on this "skinless man."
11 - Darsidian Moor
After telling Tiris that you would help him find his girlfriend, make a visit to this location to speak with a man named Darsidian Moor. It seems that Darsidian is searching for a creature known as the Skin Dancer, who is no doubt the same creature involved with the disappearance of Tiris' girlfriend. Agree to help Darsidian destroy this Skin Dancer and he will tell you to meet him in a walled-off section near the orange pavilion on the east side of Trademeet (area #12).
12 - The Hidesman's Death
If you've agreed to help Darsidian Moor at area #11, then he will be waiting for you when you arrive at the pavilion. He will claim that he just battled the Skin Dancer, but is injured and needs you to kill Rejiek before he awakens. Do not attack the person on the ground, but instead talk with them to learn that it is actually Tiris' girlfriend Raissa.
At this point, Rejiek and Darsidian (who apparently
is the Skin Dancer) will ambush your party and you'll be forced to defend yourself. It is a surprisingly easy fight, so take them out and then speak to Raissa once more. She will tell you that Rejiek and Darsidian stole her skin and have turned her into a Skin Dancer. Her skin is actually on Rejiek's corpse, so she will grab it and put it back on (nasty!). However, in order to return to her former self, she requires the casting of a Restoration spell. If you don't have access to the fourth level Lesser Restoration spell, pay a visit to the local Temple of Waukeen, obtain a scroll, and then return.
Once you have the means to cast Lesser Restoration on Raissa, cast it on her to receive 30,000 experience points and a point of reputation when you return to Tiris' home and speak with Jenia.


