 Did we miss anything on this map? Is there something we didn't discover? Let us know!
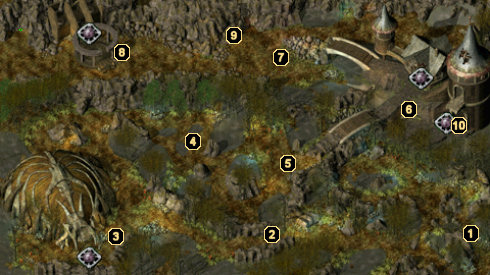
1 - Arrival
Did we miss anything on this map? Is there something we didn't discover? Let us know!
1 - Arrival
A Druid by the name of Pauden will meet you at the entrance of the grove to warn you that it is under the protection of the Druids of Tethir. When you mention Cernd, Pauden seems happy to hear that someone is finally coming to the grove's aid. He also reveals the a Shadow Druid named Faldorn has been seducing the other Druids and that someone (like Cernd) should challenge her leadership of the grove.
After the conversation with Pauden, be careful as you move into the grove as there are a couple of Trolls awaiting your arrival. Use acid or fire to finish them off for good, then continue further into the foliage.
2 - Spider Attack
There are a few Spiders here, which can be a pretty nasty fight if you get poisoned.
Antidotes and Cure/Slow Poison spells are a huge bonus.
3 - Troll Hut
Trolls await you in the front and back of this hut. However, the real challenge comes inside. When you zone into this hut, there will be two regular Trolls, a Spectral Troll, and a Spirit Troll. This can be a pretty rough fight, so it would be a good idea to rest before going inside. Any summoned creatures are a welcomed bonus, as well. unless your party is pure melee, you probably don't have enough tanks to keep the Trolls off of your weaker members.
After that battle, you are not done. There is still another Troll and three Giant Trolls left in the back of the room. Using Hide in Shadows or Invisibility, scout around and try to pull the remaining Troll solo. Setting traps with a thief in the middle of the room will also help when you go to fight the three Giant Trolls. Don't hesitate to run back outside and rest again during the battle if need be.
After vanquishing all the foes, you can loot a couple of bone piles. Along with some gold, you find the
Bracers of Archery and the
Spear of the Unicorn +2.
4 - Druid / Troll Battle
Here you run into a group of druids fighting three Trolls. Feel free to just watch if you're trying to avoid any casualties. Regardless of what you do, the druids turn on you when the Trolls have fallen. The primary spell caster among them can make this a tough fight.
5 - Kyland Lind
Kyland Lind confronts you here with a group of Shadow Druids at his back. After a short dialogue, they attack. We recommend spreading your characters out in order to interrupt as many spellcasters as possible. Once Kyland's health gets fairly low, he retreats. You'll have to fight the remaining Shadow Druids to the death, however.
6 - Raksasha Hut
In this hut you'll find an old lady selling potions. During your work on the Tradesmeet Dao Djinn quest, however, you'll find out that this is actually a Raksasha. After taking the appropriate steps in Tradesmeet, she will morph into the Raksasha and summon two others. At this point in the game, this is a
very hard fight, so you may not even want to deal with it just yet.
Once you do decide to take them on, though, you'll be able to grab yourself a
Periapt of Proof Against Poison and a
Cleric's Staff +3. One thing worthy of note is that if you have Jan in your party, he will detect the Raksasha's illusion upon your first visit and you will not be able to buy any potions.
7 - Myconids
Buff with at least haste before these two Myconids see you and start summoning other mushrooms to fight you. Unload everything you have on these fast, as killing them quick makes it a much easier fight. If you give them time to summon, this battle can quickly get out of hand.
8 - Dalok
Dalok and friends await your party to prevent you from entering inside. Compared to some of the fights, this one isn't too hard, and you'll come out with a
Flame Tongue and
Gnasher.
Once inside, you enter into a war of words with Faldorn, the lady that has taken over the
Druid Grove. If you have a Druid in your party, challenge her. I chose Cernd because his ability to shapeshift into a Werewolf makes this a pretty easy fight. If you choose Jaheira, though, you can earn yourself a
Staff of Thunder & Lightning. She's not very difficult, and once she has been defeated, you can return to Tradesmeet as a hero.
9 - Tower
Belm +2 lies hidden in a bail of hay within this tower.
10 - Cernd
If you did not allow Cernd to join you in Tradesmeet, he'll meet up with your party here. If you still do not put him into your party, you skip the outside battle at area #8. I would suggest that you at least boot a party member temporarily here. There are a couple items at area #8 that you might find worth the fight.


