 Did we miss anything on this map? Is there something we didn't discover? Let us know!
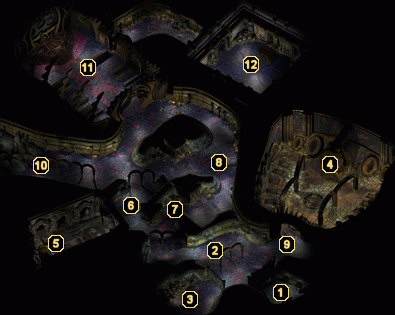
1 - Arrival
Did we miss anything on this map? Is there something we didn't discover? Let us know!
1 - Arrival
You'll first enter the Dead Nations through these double doors, where you'll be confronted by a skeleton priest named Hargrimm and other undead inhabitants. You can either become prisoners (recommended) or start slaughtering them. If you attack, you can disregard the mini-quests involved for this location as they will be impossible to perform when all the undead are hostile.
2 - Acaste
A skeletal woman named Acaste will be standing here speaking to other undead. She complains about the rules imposed upon them by the "Silent King" inside area #4. If you know the truth about the "Silent King", you can tell Acaste and cause a bit of a stir.
Additionally, you can find the Riddling Skeleton in this area. If you haven't helped the Puzzled Skeleton at area #8, you can have a riddle contest with him for some experience. If you
have helped the Puzzled Skeleton, then the Riddling Skeleton will be angry at you for giving answers to his riddles.
3 - Exit
This exit leads to the
Drowned Nations, but you won't have access to it until you've found a way out.
4 - Silent King's Throne Room
This door leads to the "Silent King", but it's guarded by skeleton warriors. Attacking them makes all undead in the area hostile. To avoid such a confrontation, talk to Stale Mary at area #5 to find out about a portal to access the king's throne room from the inside.
5 - Stale Mary
A skeletal woman named Stale Mary is at the end of this room. She's difficult to understand, but she can teach the Nameless One how to speak with the dead. Not only that, but you can ask her about the "Silent King" and she will show you a portal to get into his throne room behind the doors at area #4.
6 - Doubtful Skeleton
Here you'll encounter the Doubtful Skeleton. He is pondering whether or not creatures should continue living or die at a certain point. To remove Soego from his room at area #12, you can tell him about the Doubtful Skeleton here.
7 - Skeletal Merchant
You can purchase quite a few charms and weapons from the skeleton merchant here. Have a peek at the table below to see if there's anything you need to purchase.
8 - Puzzled Skeleton
Here you'll encounter the Puzzled Skeleton. He had spoken with the Riddling Skeleton near area #2 and is trying to figure out the answer to the riddle. If the Nameless One has a high enough intelligence, you can help him with the riddle for some experience.
9 - Knifed Ghoul
You'll find the Knifed Ghoul here, the one who has
Uhir's Knife from the Buried Village. He won't give it up without something in return, though, and will demand that you bring him 6 cranium rat tails. You can find some cranium rats at area #10. Kill them and return for the knife.
10 - Cranium Rats
Once you've spoken with the Knifed Ghoul at area #9 and he's requested 6 rat tails, you can find a group of cranium rats running around here. Kill them and return the tails to the Knifed Ghoul.
11 - Hargrimm
The skeletal priest Hargrimm wanders this area. One way out of this place is to perform some quests for Hargrimm. First, he'll ask you to kill some cranium rats at area #10. Then, he'll ask you to get rid of Soego at area #12.
In order to complete the second task, you have to tell Soego about the Doubtful Skeleton at area #6 to get him to leave the room. Then, read his journal, and report your findings to Hargrimm. This will lead to Soego's demise and Hargrimm will grant you your freedom.
12 - Soego
A dustman named Soego is here. He is important for two things. First, you can tell his whereabouts to Emoric back at the Gathering Dust Bar in the Hive in order to join the Dustmen faction. Secondly, you can tell him about the Doubtful Skeleton at area #6, read his journal when he leaves the room, tell Hargrimm about his deceit, and gain your freedom when Hargrimm kills him.
Once Soego is dead, grab his skull as you may need it in the
Lower Ward.


