 Did we miss anything on this map? Is there something we didn't discover? Let us know!
Life in the Hive is the worst of all places unless, of course, a berk likes living in the heart of decay, where anyone's life is cheaper than the cost of a cutter's next meal. Life here is seldom boring, but it's also short and deadly. Honest work is scarce, so people live by whatever means they can. For most, that means stealing or signing on for dangerous jobs that no sane basher'd touch. This is where a cutter goes when he needs bodies for a staged not, if he wants to raise a company of ill-trained fighters, or if he wants an assassin willing to risk all on a desperate job.
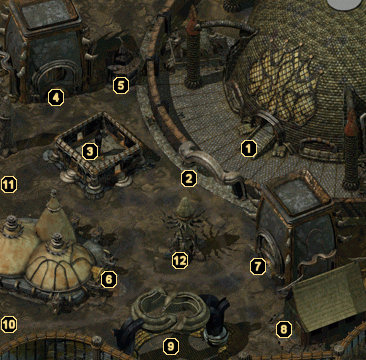
1 - Mortuary Entrance
Did we miss anything on this map? Is there something we didn't discover? Let us know!
Life in the Hive is the worst of all places unless, of course, a berk likes living in the heart of decay, where anyone's life is cheaper than the cost of a cutter's next meal. Life here is seldom boring, but it's also short and deadly. Honest work is scarce, so people live by whatever means they can. For most, that means stealing or signing on for dangerous jobs that no sane basher'd touch. This is where a cutter goes when he needs bodies for a staged not, if he wants to raise a company of ill-trained fighters, or if he wants an assassin willing to risk all on a desperate job.
1 - Mortuary Entrance
If you exited the Mortuary via the front door, you'll find yourself here. If you decide that you need to return to the Mortuary, you can either speak with Pox, the collector standing at area #2, or convince the Dustman Guards to let you back in (telling them that you want to pay your respects to Deionarra in the northwest memorial hall will do the trick).
2 - Pox & Dabus
A Dustman by the name of Pox stands near the archway to the Mortuary. If you quiz Pox about the location of Pharod, he will mention that his boss Sharegrave in
Ragpicker's Square might know of his whereabouts.
If you find yourself needing to get back into the Mortuary (you'll have to at the end of the game), you can convince Pox to sneak you back in. If you have a charisma of 13 or higher, you can just play dead for 500 experience points. If you aren't able to play dead effectively, then you have to let Pox cut you down with two rusty daggers, though you won't get experience for this route.
Just to the northwest of Pox, you'll find a dabus (one of the Lady of Pain's personal janitors) working on the Mortuary's outer wall. When you speak with him, Morte will give you some background information on what exactly a dabus is and their purpose for the Lady of Pain. If you have an intelligence of 13 and a wisdom of 13, you can actually figure out how to communicate with the dabus, which will earn you 1000 experience points. The dabus doesn't have a whole lot to say, though.
3 - Sev'Tai, Death-of-Names, & Quentin
Three people are standing in this area: Sev'Tai, Death-of-Names, and Quentin. You can talk to them all, but Sev-Tai and Death-of-Names are the only two who will either give a quest or complete one. Quentin simply gives you some background information about the monolith in the center of this area and how the Dustmen carve the names of all that die on the rock and walls here.
The strange-looking Sev-Tai will ask that you kill three Chaosmen responsible for destroying her cart and killing three of her sisters. The three responsible are called the 'Starved Dog Barking' thugs and can be found in
the southeast portion of the Hive. Once they're dead, you can return for 250 experience points.
If you've talked to the "Crier of Es-Annon" in
the southwest portion of the Hive, Death-of-Names will be able to carve into the monument for you.
4 - Mausoleum
Here you'll find the entrance to the
Mausoleum. You won't be able to open the portal into the Mausoleum until you've spoken with Norochj at area #6, though.
Just outside the entrance, you will run into a woman named Ingress. She will tell you about her travels through the planes and that she cannot find her way home. If you talk to Candrian at the Smoldering Corpse Bar in
the southeast portion of the Hive, he will agree to help her get home. This will earn you 750 experience points and get you
Ingress' Teeth, a great weapon for Morte that increases in power as Morte levels up.
5 - Shilandra's Kip
Shilandra is of no real importance until you've visited
the northwest portion of the Hive and accepted the box from Mar. This will eventually lead to your return to this very kip.
Once you've returned here, you'll be awarded 250 experience points and Shilandra will tell you to bring the box to Aola in the
Alley of Dangerous Angles.
6 - Gathering Dust Bar
There are plenty of quests inside the
Gathering Dust Bar, but before entering, walk up to the zombie outside called "The Post". Read the different notes posted to him for a handful of quest leads, then grab the cobblestone out of his head for 250 experience points.
You can also find a man by the name of "Baen the Sender" just north of the zombie who will ask you to help him find a man named Craddock elsewhere in the Hive to deliver a message. If you accept, he will recite the message to you ("The shipment must be in Curst by the third-day or there will be a penalty.") and tell you that this Craddock is a giant of a man and is an overseer in one of the Hive marketplaces. After completing the task, return to Baen for 500 experience points.
7 - Open Tomb
This open tomb is where you'll end up if you took the hidden portal out of the Mortuary. Lying on the floor of the tomb are a pile of coppers and a note from someone named Penn instructing Vaxis (the guy disguised as a Zombie Worker on
the second floor of the Mortuary) to first secure a new hiding place and then start investigating Pharod. The note mentions that Initiate Emoric in the Gathering Dust Bar might know some information about Pharod's whereabouts.
Additionally, the game will allow you to rest inside this tomb, so take advantage of the situation whenever you get a chance.
8 - Angyar's Home
Angyar makes his home here. Go inside and you'll find out that he's very upset about something. Talk to his wife and she will tell you that he recently signed a Dustmen contract. Go to the Gathering Dust Bar at area #6 and convince Mortai Gravesend to hand it over.
When the contract is in your hands, you will receive 500 experience points. Bring the contract back to Angyar and tear it up in front of him to earn another 750 experience points. Doing this favor for Angyar for free will shift your alignment toward Good. You'll also be able to ask him about Pharod's location for yet another 500 experience points.
If you're in need of minor healing supplies, you can purchase a couple from Angyar's wife.
9 - Exit
This exit leads to
the southeast portion of the Hive.
10 - Exit
This exit leads to the
Alley of Dangerous Angles.
11 - Exit
This exit leads to
the northwest portion of the Hive.
12 - Annah
This will be your first encounter with Annah, a striking red-haired Tiefling girl. She won't be very friendly at this point, but you can attempt to learn the whereabouts of Pharod from her. If you "Turn on the Charm" (which requires a charisma of 14) and hand her ten coppers, she'll tell you to look for him in the Alley spireward (southwest) from the Mortuary.
Using her directions, you'll wind up in the
Alley of Dangerous Angles, but this turns out to be the exact opposite direction of where you'll actually find Pharod. If you realize this and confront Annah about the "alley filled with heavily-armed thugs" that she sent you into, she'll simply scoff at you and stick to her story. You can threaten her life as either a truthful or bluffing statement, but this won't get you anywhere and The Nameless One's alignment will shift toward evil or chaotic (respectively) if he fires off one of these responses.


