 Did we miss anything on this map? Is there something we didn't discover? Let us know!
It's argued that this area of the city isn't a proper ward at all, an argument that ignores the fact there's no definitions of wards to be found anywhere. Certainly the Lower Ward's been shrinking over the decades. Old-timers remember when it included the City Armory and the Mortuary. (Younger folks and newcomers place these in The Lady's Ward and the Hive Ward, respectively.) This creates a little confusion between young and old. Whatever the boundaries are, most sods agree that the Great Foundry is the center of the ward. Radiating out from this are lightless warehouses, smoky mills, ringing forges, and a host of other small workshops. In this district are concentrated most of the city's craftsmen.
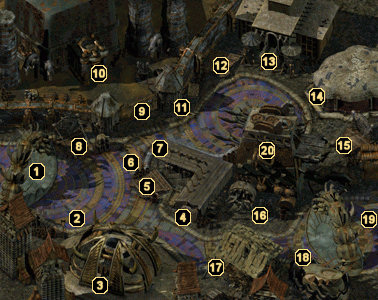
1 - Arrival
Did we miss anything on this map? Is there something we didn't discover? Let us know!
It's argued that this area of the city isn't a proper ward at all, an argument that ignores the fact there's no definitions of wards to be found anywhere. Certainly the Lower Ward's been shrinking over the decades. Old-timers remember when it included the City Armory and the Mortuary. (Younger folks and newcomers place these in The Lady's Ward and the Hive Ward, respectively.) This creates a little confusion between young and old. Whatever the boundaries are, most sods agree that the Great Foundry is the center of the ward. Radiating out from this are lightless warehouses, smoky mills, ringing forges, and a host of other small workshops. In this district are concentrated most of the city's craftsmen.
1 - Arrival
After leaving the
Alley of Lingering Sighs, you'll enter the Lower Ward right here. If Morte is in your party, you will be rushed by some Wererats and they will kidnap him (you're not allowed to intervene). You will later find that Morte has been brought to the old building at area #17.
After getting your bearings, you can talk to Korur (near the arch) and have him teach you fighting skills. He can teach up to a total of five proficiencies in one weapon type, which is the highest you can learn.
2 - Kii'na
If you've been attacked by the Githyanki Yi'minn (near area #11), you will have overheard him about an attack on a Githzerai fortress. Here, at area #2, you can tell Kii'na about Yi'minn's plans.
3 - Brokah and Miccah's Pawnshop
This is the Pawn Shop, run by Miccah and Brokah, where you can buy and sell equipment. Refer to the table below for a full list of the items you can pick up.
4 - Giltspur's Auction Block & Marketplace
Amidst a crowd of citizens, you can speak to a man named Giltspur. He will ask you to bring a note to Scofflaw Penn at area #14. Do the task and you'll get 6000 experience points when you return to Giltspur.
Next, he'll ask that you bring another note to Keldor in the Great Foundry (which is an alternative way to get into the foundry without having to have your legacy from the Advocate). When you return again, Giltspur will ask you to take one last note to the Smoldering Corpse Bar in the southeast portion of the Hive for another experience bonus.
If you'd like to purchase any of the items listed in the first table below, pay a visit to Giltspur. Otherwise, the other items listed in the following three tables must be purchased from inside the marketplace.
5 - Byron Pikit
If you've agreed to help Trist at area #12, you'll want to talk to Byron Pikit here. He will tell you that someone stole the document, so you'll have to talk to Lenny at area #16 about it. If you tell Lenny that Byron sent you, but you are working for Trist, he will send you to the Warehouse (area #13) to get the document and explain how to get Byron arrested.
Get the document from the Warehouse and then go back to area #12 to free Trist for a nice experience reward. If you choose to, you can have Byron arrested by telling Corvus what you have learned.
6 - Zerb, Gort, & Thorp
You'll meet three large brutes here by the name of Zerb, Gort, and Thorp. Thorp will tell you that Xanthia, the woman standing near area #8, has asked that he kill an Abishai in combat because he spilled a drink on her dress. If you speak to Xanthia, she will tell you that Abishais can only be killed by magic and intends for Thorp and his friends to be slaughtered.
If you choose to warn Thorp about the consequences of using melee on an Abishai, you will gain 6000 experience points and each of the brutes will hand you a pouch of coins for saving their lives.
7 - Marketplace
This building is a marketplace of sorts where you can buy items, spells, and weapons. Check area #4 for a full list of what can be purchased.
8 - Sebastion
Speak with the mage named Sebastion standing here and he will offer to cure some of the scars on your body. In return, he will tell you that he cannot fulfill a contract he has made with the creature Grosuk at area #15 and wants you to kill the best for him.
If you do, you will gain an experience reward and a +2 bonus to your charisma (when Sebastion heals your scars), but if you choose to tell Grosuk about Sebastion's plans, you will only get an experience reward.
9 - The Great Foundry
This is the gate to gain entry into the
Great Foundry. You must have Giltspur's note or a receipt to get past, the latter of which you can obtain in your legacy at the Advocate's home in the
Clerk's Ward.
10 - Foundry Entrance #2
This entrance leads into the
Great Foundry.
11 - An'azi & Yi'minn
A woman by the name of An'azi stands here. Speak with her to learn that she is dying. If Dak'kon is with you, you can have him take her out of her misery for an experience reward.
Additionally, near this area is a Githyanki named Yi'minn. If Dak'kon is not in your party, you will end up in a battle with him, which will lead to you overhearing him speak about an attack on a Githzerai fortress (which you can tell to Kii'na at area #2). However, if Dak'kon is in your party, they will fight and you will not get the dialogue about the attack on the fortress.
12 - Trist
This is a slave market, where you'll meet a woman named Trist. She will tell you about how she was sold into slavery and will ask for you to help her out of the situation. See area #5 for more information.
13 - Warehouse
This is the entrance to the Warehouse, where you can pick up a few items. If you're helping Trist get out of slavery, you'll eventually stop here for a stolen document. If you have a high wisdom, you'll also be able to claim a bag of coins that you remember storing here previously.
Finally, if you've arranged to become an Anarchist with Bedai-Lihn on the second floor of the
Great Foundry, you can buy equipment from the Anarchist named Conall in the back of the Warehouse. See the table below for a full list of what Conall is able to sell you.
14 - The Print Shop
The Print Shop is run by a man named Scofflaw Penn, who is involved in a couple of quests. If you've talked to Giltspur at area #4, you can deliver a note to him for some experience.
Also, after you've arranged to become an Anarchist with Bedai-Lihn on the second floor of the
Great Foundry, you can come to Scofflaw to join the faction. To do so, you must tell him the secret code that Bedai-Lihn told you ("The city must burn.") and then slay Qui-Sai at the
Civic Festhall in the Clerk's Ward. Once you've joined the faction, you can pay a visit to what Scofflaw calls the "Vault of the Ninth World" in the warehouse at area #13 to purchase equipment. This "vault" is essentially the items that Conall the Anarchist can sell to you.
15 - Grosuk & Siege Tower Entrance
A creature named Grosuk stands here. If you've spoken with Sebastion at area #8, you'll either want to kill Grosuk or tell him that Sebastion cannot honor their contract. Either way gets you experience, but killing Grosuk gets you a +2 bonus to your charisma.
You can also obtain access to the
Siege Tower at this spot. Before you can enter it, however, you must speak to Lazlo in the marketplace with entrances at area #7 or area #4.
16 - Lenny
There is a thief standing here named Lenny. Lenny can train you as a thief and even provide you with the
Punch Daggers of Shar. He is also involved if you choose to help Trist escape slavery. See area #5 for more information.
17 - Bones of the Night
If Morte was kidnapped from you at area #1, you will find him within this building. Even if you didn't have Morte in your party, you'll still want to head inside to talk with Lothar and deal with the wererat Mantuok. Refer to our
Bones of the Night walkthrough for more information.
18 - Hamrys the Coffin Maker
This is the shop of Hamrys the coffin maker and his assistant Dimtree. If you are helping Nihl in the
Great Foundry build your dream machine, he will send you here to get a coffin pillow. When you speak with Hamrys, he will ask you to pay a visit to the warehouse at area #13 to pick up the pillow. Once you have the pillow, return it to Nihl for an experience reward and the key to enter the Dream Machine.
If you have the Speak to the Dead ability from the
Dead Nations, you can discover that Dimtree is a zombie created by the mage Sebastion at area #8. He will ask that you talk to Sebastion and have him released from his undeath. Go talk to Sebastion and he will tell you that his contract prevents him from telling you the command word that will release Dimtree, but he will open a book in the right page and turn away, allowing you to read the command word. Head back to Dimtree and release him for a nice experience reward.
One final quest with Hamrys involves asking him abut your tomb (the one in the
Drowned Nations). He will explain that his father built it, but he never returned (you will find out towards the end of the game that your Practical Incarnation killed him to keep the tomb a secret). Ask Hamrys for the tomb's plans and he will send you to the warehouse at area #13 to retrieve them. Once you get the plans, you can return to Hamrys for yet another experience boost.
19 - Exit
This exit leads to the
Clerk's Ward.


