 Did we miss anything on this map? Is there something we didn't discover? Let us know!
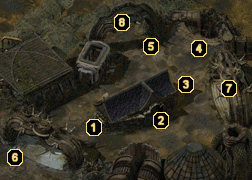
1 - Mar's Box
Did we miss anything on this map? Is there something we didn't discover? Let us know!
1 - Mar's Box
A man named Mar will be standing here. He will offer a box to you, claiming that it needs to be delivered to Ku'atraa in
the southeast portion of the Hive, then run off. Bring the box to Ku'atraa (in the warehouse), who will tell you to bring it to Brasken in
the southwest portion of the hive, then run out of the warehouse screaming. Once brought to Brasken, he will explain that the box is cursed and you'll need to bring it to Shilandra in
the northeast portion of the Hive.
Showing the box to Shilandra will get you more information. She will tell you that the box holds a demon and recommend that you bring it to some sort of priest. Head to the
Alley of Dangerous Angles, where you can have Aola (the priest in the temple) take care of the problem. Much later in the game, when you return to Curst (and it's gone), you will encounter the demon. This final encounter should make all the running around worthwhile, though.
2 - Flophouse
The Flophouse is run by a man named Arlo, though he serves little importance here. Head toward the back of the building, where you'll encounter a man named Nestor. Nestor will send you on a short quest to get his fork back from One-Ear at area #5.
Once you've retrieved the fork, Nestor will reward you with the
Obsidian Earring and you'll receive a decent experience bonus.
Keep in mind that the Flophouse is a sanctuary of sorts and therefore can always be rested in. There aren't a whole lot of places where this is the case, so return here whenever you're in need of some relaxation.
3 - Porphiron
Pophiron will tell you that he is a highly trained fighter, but due to his discipline he was unable to attack a group of thugs that stole his necklace of beads. Therefore, he will ask that you retrieve the beads for him. Head to
the southeast portion of the Hive and take care of the thugs either by force or by bribing them. Return the necklace to Porphiron and you'll be awarded experience, as well as training as a Fighter if you wish to change classes.
4 - Fleece
Here you'll encounter a shady fellow named Fleece, who will ask you for directions. He is actually a thief, however, and when you talk to him he will attempt to pickpocket you. You can watch him pick your pocket if you have a wisdom of 13+, a pickpocket skill of 10+, or if Annah is in your party, the result of which depends on your attributes.
If your wisdom is below 13, but your intelligence is 13+, you will gain 750 experience points and a +1 bonus to your pickpocket skill. If you have a wisdom greater than 12 but less than 16, you will gain 1000 experience points and a +3 bonus to your pickpocket skill. If you have a wisdom of 16+, you will gain 1250 experience points and a +5 bonus to your pickpocket skill.
Regardless of which result you end up with, you can grab Fleece's hand with a dexterity of 13+ and get your money back. If your charisma is 11+, you can even coerce him into handing over all of his money as well.
5 - One-Ear
One-Ear has taken Nestor's fork (the guy in the Flophouse at area #2). If you've agreed to get the fork back for Nestor, you will be forced to kill One-Ear.
6 - Exit
This exit leads to
the southwest portion of the Hive.
7 - Exit
This exit leads to
the northeast portion of the Hive.
8 - Exit
This exit leads to
Ragpicker's Square.


