 Did we miss anything on this map? Is there something we didn't discover? Let us know!
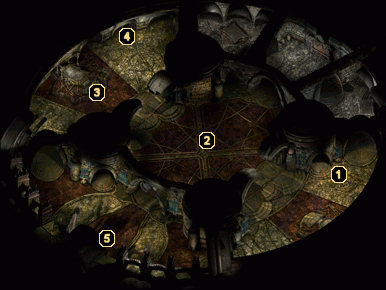
1 - Arrival & Zombie Worker #732
Did we miss anything on this map? Is there something we didn't discover? Let us know!
1 - Arrival & Zombie Worker #732
When you arrive down these steps, pay a visit to the nearby Zombie Worker. This particular zombie is marked "732" and is carrying a large tome in its hands. Carefully remove the book from its grip, then study it to find that it's called the Tome of Bone and Ash. Keep it handy - you can use it to deconstruct the Giant Skeletons in the next chamber.
2 - Giant Skeletons
Each of the four corners of this room contains a Giant Skeleton, each of which has been animated as a guardian by the Dustmen. You can simply fight them if you'd like, but it is more rewarding to study them and figure out a way to recall their enchantment instead. If you choose to fight, you may want to grab the
Crescent Hatchet off the north wall before rushing into battle.
If you'd rather not go toe-to-toe with the skeletons, study the symbols on each skeleton's armor, then try to dispel the enchantments. This will allow you to notice a pattern to the symbols and you'll receive 500 experience points for doing so. At this point, you can either refer to the Tome of Bone and Ash from area #1 for help on breaking the enchantment, or, if you have an intelligence of 16 or greater, you can try to mar the runes without any help. Either way, you'll want to mar the runes maintaining the warding enchantment first, then work backward through the rune pattern, canceling the necromantic, then the armoring enchantment. The other method offered to you will be perceived as an attack by the skeleton and you'll have to battle it.
Once you've stripped the first skeleton of its enchantments, it crashes to the ground in a heap of bones and you'll be awarded 800 experience points. In addition, you'll receive a
Rune of Lesser Warding from the collapsed wreckage. Continue with the other three skeletons to receive 800 experience points for each one and a
Rune of Armor,
Rune of Greater Warding, and
Rune of Shielding.
One final aspect worthy of note is that if you ask Morte if he'd like one of the Giant Skeletons for a body, then reconsidering doing so because you're worried about him, The Nameless One's alignment will shift toward Good.
3 - Deionarra
Approach these steps to speak to the ghost of Deionarra, a woman The Nameless One once cared for. She is bitter about your past experiences with her, but if you're pleasant to her in dialogue, you can actually glean some very useful information. For example, if you tell her that you are in danger and need to leave the Mortuary for a place of safety, she will mention the same portal that Zombie Worker #821 may have mentioned to you on the second floor. This portal is at area #4, but you'll need a
Bone Charm to activate it.
If you continue on and quiz Deionarra about who
you are, she will explain that you are "one who dies many deaths" and that you possess the ability to trace the life of those who die near you. This will earn you 1000 experience points and grant you the ability to Raise Dead.
When you tell her that you're ready to depart, she will tell you that she can foresee your future and she will tell you what she sees if you promise her that you will return with some means to save her or join her. If you agree, she will tell you a prophecy of sorts that ultimately ends in you finding a way to destroy the one thing that keeps you alive. Ponder the cryptic message for a bit, then bid Deionarra farewell.
Keep in mind that if you're ever rude to Deionarra during your conversation with her, she will curse you and leave.
4 - Portal
If you possess the
Bone Charm from
the third floor of the Mortuary, you can activate a portal in this archway. This is the same portal mentioned by Zombie Worker #821 on the second floor or the ghost of Deionarra just to the west. Once activated, the portal will teleport you to the open tomb in
the northeast section of the Hive.
5 - Exit & Soego
The exit out of the Mortuary stands along this wall, but it's locked. Speak to the Dustman named Soego that paces around this area and either tell him that you were here for an internment earlier and are ready to leave or that you were here to see Dhall and have decided to do it another time. Either of these responses will earn you 500 experience points and prompt Soego to unlock the exit for you.


